
Decorative Lighting Pole Design Guide for Parks, Gardens and Commercial Spaces
Written by the Surya Traders team. Category: Decorative Lighting.
1. Define the Visual Character ofthe Project
A park, a hotel entrance, a residential community, a heritage-style property and a modern commercial campus each speak a different design language. The pole should join that conversation, not interrupt it.
Start with a short design brief before you look at a single catalogue. Walk the site and note what already shapes its character:
- Gates, railings and boundary walls
- Benches, planters and other landscape furniture
- Paving materials and pathway edges
- Building façades and entrance canopies
- Planting, mature trees and water features
Then describe the style in two or three words, such as “formal and warm” or “clean and contemporary”. Every pole you shortlist should pass that test.
As a rule, simple geometric surroundings suit restrained poles, while traditional settings can carry a more expressive silhouette and richer detailing. Colour belongs in the brief too. A black-and-gold pole sets a very different tone from a minimal metallic one, and neither is automatically better.
Finally, aim for a clear visual hierarchy. The shaft, bracket, lantern and ornament should read as one design, and every element should earn its place. If you can remove a detail and the pole looks better, it was not needed.
When you are ready to compare styles, browse the Decorative Lighting Pole range from Surya Traders.
2. Design Around Human Scale and Viewing Distance
A pole is judged from where people stand, not from the product photo. A design that looks refined in a close-up image can look heavy beside a narrow path or thin in a wide plaza.
Think about two viewing distances:
- Close range (paths, gardens, seating areas): people see the base, the lower shaft and the surface finish. Craftsmanship and detail matter here.
- Long range (entrances, plazas and wide approaches): the overall silhouette matters most. Fine ornament disappears at a distance, and too much of it becomes visual noise up close.
Height should be treated as part of the composition, not just a number. The relationship between pole height, luminaire size, arm projection and nearby buildings should feel proportionate.
The Illuminating Engineering Society’s ANSI/IES RP-43-25 is a useful wider reference. It gives pedestrian-oriented recommendations for exterior lighting, covering comfort, glare avoidance and the colour of light, not just brightness.
A practical tip for larger projects: ask for an elevation drawing that shows a human figure and a nearby building or tree beside the pole. For high-visibility areas, a single site sample before you order the full quantity can save costly corrections.
The review question is simple. Does this pole look right from the place where people will actually see it?
3. Coordinate the Shaft, Bracket, Lantern and Details
A decorative pole is an assembly, and its appearance depends on how the parts relate to each other. Typical components include:
- The shaft, which sets the main vertical form
- The bracket or arm, which holds the luminaire
- The lantern or luminaire, which adds visual weight at the top
- Collars, finials and base sections, which add character
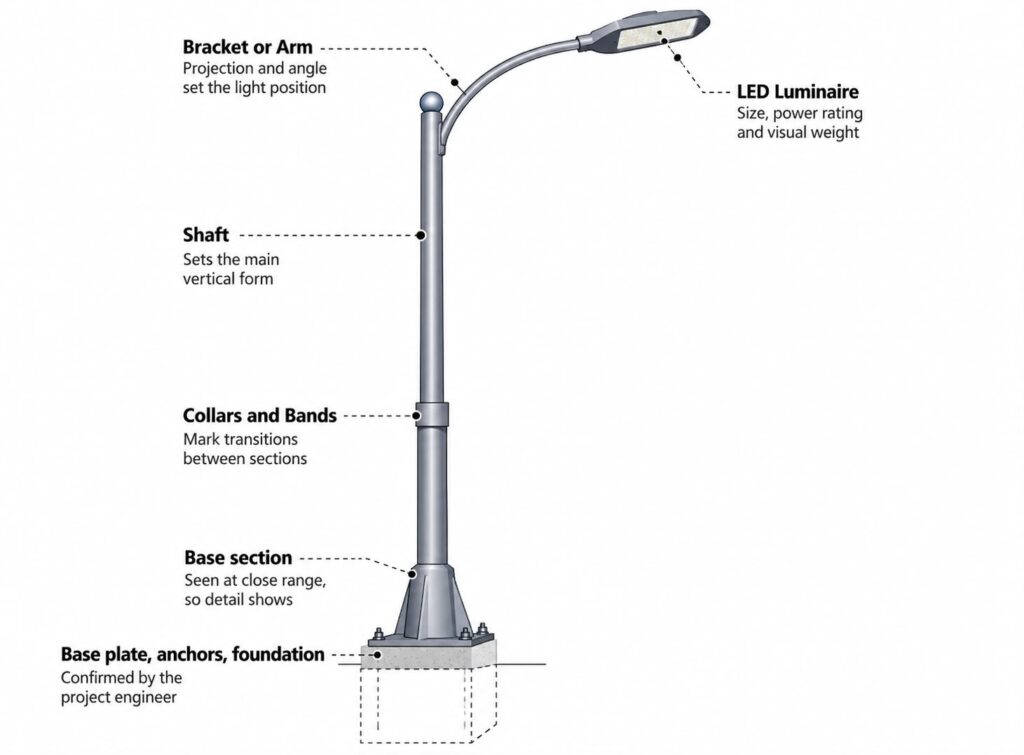
From the finial down to the foundation, each part answers a different design question.
Balance is everything. A large lantern on a very slender shaft can look unstable, while an oversized shaft can swallow delicate ornament. A curved bracket softens the look and suits traditional settings. Straight or controlled geometry feels more contemporary. Whichever you choose, the bracket must also hold the luminaire at the right position and angle for the lighting plan.
Repeat motifs deliberately. If the top has a finial, a matching base treatment ties the design together. Small collars or bands can mark the transitions between sections without cluttering the shaft.
Before approval, review the complete assembled drawing, not individual parts. A pole can look attractive as separate pieces and still feel unbalanced once everything is joined.
A good drawing also lets the whole team check dimensions and proportions before fabrication begins, when changes are still cheap.
4. Plan Placement Around Paths, Entrances and Activity Zones
Place poles according to how people move through the space. Placement shapes both the visual rhythm of the landscape and the pattern of light after dark.
- Pathways: regular spacing creates order and a sense of direction.
- Entrances: tighter grouping can frame the arrival point.
- Open gardens and plazas: poles may need to work around trees, planting beds, water features and seating.
Avoid treating every zone the same way. The design should stay recognisable throughout, but the arrangement can respond to each area’s purpose.
Trees deserve special attention. Do not hide a pole behind mature foliage, and do not place it where growing branches will reach the luminaire. At the same time, protect important roots and landscape features during installation.
Good lighting also avoids waste. Aim light only where people need it, avoid spill onto neighbouring property, and use controls so lights are not on when nobody needs them.
Before fabrication, mark pole positions on a site plan and, if possible, on the ground with stakes. Walk the route at a visitor’s eye level. Problems that are obvious on site are easy to miss on paper.
5. Choose a Finish That Works With the Landscape
The same pole can look traditional, contemporary or premium depending on its finish. Start with the materials around it. Dark metalwork coordinates well with gates, railings and benches. A lighter metallic treatment suits modern architecture and open landscapes. A two-tone finish can highlight ornamental sections, but use it with restraint.
Give the base extra thought, because people see it at close range. A plain shaft with an overly elaborate base, or the reverse, can make the composition feel uneven.
Durability belongs in the same conversation. Rain, humidity, dust and sunlight act on outdoor poles for years, so the protective system should suit the environment and your maintenance plan. For steel poles, hot-dip galvanizing is a common route, and ISO 1461 specifies the general properties and test methods for hot dip galvanized coatings on fabricated iron and steel articles. In India, the coating requirement is typically specified through IS 4759.
Some projects add a painted or powder-coated top finish for colour. ISO 12944-5 describes protective paint systems for steel structures and guides their selection by environment. Ask how the surface is prepared and how each layer is applied.
Never rely on a vague phrase such as “premium colour”. Write down the surface treatment and give a colour reference, such as a RAL code or an approved sample. One approved finish across the whole project keeps every zone looking uniform.
6. Integrate the Luminaire Without Losing the Decorative Form
The luminaire should complement the pole, not look bolted on. This matters most with ornamental lanterns and heritage-style fittings.
Begin with size and visual weight. A large modern LED fixture can overpower an ornate pole. A small decorative lantern may look right but not deliver the light you need. Develop the pole and the luminaire together.
Mounting position changes the look of the whole assembly. A luminaire that sits too high, too low or at an awkward angle makes a good pole look unfinished. Check glare too: the fitting should light the space without shining into people’s eyes.
Warm light usually suits decorative landscapes better than harsh, bluish light.
Weather protection is also essential. Outdoor luminaires carry an IP rating, which describes protection against dust and water. The IP code is defined in the international standard IEC 60529 (published in the UK as BS EN 60529), so ask suppliers to state the rating for the exact luminaire they quote.
Finally, plan the practical details: cable entry, wiring route, earthing and access for servicing. Decide them during design, not at the site.
The goal is one coordinated installation, where the pole supplies the form and the luminaire supplies the light.
7. Prepare the Engineering and Maintenance Specification
Even a beautiful design needs a proper technical specification. Appearance alone does not make a pole suitable for outdoor use.
Your specification should state:
- Height and quantity
- Material and wall thickness or structural section
- Arm arrangement and projection
- Luminaire mounting details
- Base plate and anchoring connection
- Surface treatment and finish
- Required drawings and documents
The foundation should be designed for the complete assembly, including the shaft, arm and luminaire, and the responsible project engineer should confirm it based on site conditions. Wind exposure matters most in open locations, so share the site details with the manufacturer.
Think about maintenance before you approve the design. Electrical access, cable entry, fasteners and luminaire servicing should stay practical after installation. A beautiful pole that is hard to inspect becomes a problem later.
Plan for replacement as well. If a pole is damaged years after installation, the owner should be able to find the original dimensions, finish and component arrangement. Approved drawings give you that record, and they serve procurement, fabrication, installation and future repairs alike.
The best specification connects design intent with practical engineering. It tells the manufacturer what the pole should look like and what the finished assembly must achieve on site.
8. Create a Repeatable Design for the Whole Project
Large projects have many zones, yet the poles should still feel like one family. Consistency is one of the simplest ways to make a lighting scheme look professionally designed.
Start with one approved design language: shaft profile, bracket style, luminaire family, base treatment, ornament and finish. Then allow variations only where the site truly needs them. An entrance might use a more prominent version, while a pathway uses a simpler one. Visitors should still recognise the relationship.
| Zone | Possible Variation | Keep Constant |
|---|---|---|
| Main Entrance | Taller or twin-arm decorative lighting pole version | Shaft profile, finish, ornament and overall design language |
| Pathways | Simpler single-arm decorative lighting pole version | Bracket style and luminaire family |
| Plazas and Seating | Shorter pole or a version with additional decorative detail | Finish and base treatment |
Manufacturing consistency matters here. Dimensions, arm angles, ornamental parts and finishes should follow the approved drawing, because small differences are obvious when units stand side by side.
Keep documentation organised: approved drawings, specifications, finish references and luminaire details in one place. Future purchases and replacements can then follow the same standard. A controlled family of designs also simplifies purchasing compared with choosing a different pole for every area.
For a wider company overview, visit the Surya Traders homepage. To learn more about the team behind the products, read About Surya Traders.
Example: Mixed-Height Poles With One Painted Finish
Here is how these steps work together on a typical landscaped project with a main entrance, a long pathway and a seating plaza. This is an illustrative scenario, not a specific client project.
The team chooses one design language and applies it in mixed heights: a taller version at the entrance, a shorter one along the path and a compact one in the plaza. The shaft profile, bracket style and ornament stay the same everywhere.
Every pole shares one painted or powder-coated finish, defined by a colour reference and an approved sample. The assembled drawing shows each height beside a human figure, so the owner approves the scale before fabrication begins.
The result is a site where the poles read as one family, even though each zone has its own lighting needs.
Common Decorative Pole Design Mistakes to Avoid
- Choosing from a photo without checking scale on site
- Approving the shaft but not the full assembly
- Over-decorating a pole that stands beside plain architecture
- Treating the pole and luminaire as separate purchases
- Writing “premium finish” instead of a real specification
- Ignoring tree growth and maintenance access
- Allowing dimensions to drift between batches of one order
Good decorative lighting pole design is planning, not decoration. Define the character, test the scale, coordinate the parts, place poles around people and document everything. When the design is finalised, contact Surya Traders with the required height, quantity, preferred design, finish and application.
Frequently Asked Questions
1. Where are decorative lighting poles commonly used?
They are used in landscaped gardens, parks, pedestrian pathways, commercial entrances, residential developments, institutional campuses and other outdoor spaces where the pole’s appearance is part of the environment.
2. How do I select a decorative lighting pole design?
Start with the architecture and landscape. Consider height, shaft profile, bracket, luminaire, ornament, colour and finish together. The design should look proportionate from the distance where people will normally see it.
3. Can decorative lighting poles be customised?
Yes, in many cases. Height, shaft proportions, arm geometry, ornamental elements and surface finish can be developed around project requirements. A detailed drawing should confirm the final appearance and dimensions before manufacturing.
4. What should I consider when installing decorative lighting poles near trees and pathways?
Review pedestrian movement, tree locations, planting beds, visibility, maintenance access, pole spacing and luminaire direction. Avoid positions where growing vegetation will block the light or interfere with the assembly.
5. What information should I include in a decorative lighting pole enquiry?
Share the required height, quantity, design reference, material, thickness or structural specification, arm arrangement, luminaire details, finish and installation requirements. Drawings or reference photographs help the manufacturer quote accurately.
October 21, 2026
October 21, 2026
October 19, 2026
October 19, 2026
October 19, 2026
October 19, 2026